Adding Pages
| Steps to add a new blank page | Steps to reuse existing pages by map or copy |
|---|---|
|
Note
|
Read more
Refer to Springshare Help - Adding Pages for instructions and best practices on Add/Reuse Pages and Change Page Options and Layout.
Edit Page Options
Click on the PAGE link at the top of the page beneath your guide title to edit your page options.
- Page Properties: change the page title and/or description
- Redirect URL: only use this if you want to hide the page content and direct the user somewhere else (like another guide)
- Visibility:
- Show on public guide - this is the default. If your guide is in draft mode, choose this option to reveal it.
- Do not show on public guide - choose this option to put your page into draft mode; it will be hidden from the public.
- Reorder / Move: drag and drop to rearrange Pages, Boxes, and Content Items.
- Delete Page
Edit Page Layout
- If you're using a tabbed navigation template: You will have three columns by default, but you can change this - each page can have 1-4 columns of varying sizes, depending on your preference. Click on the LAYOUT link to change the column options.
- If you're using a side navigation template: You have two columns. You can't increase the number of columns. The list of pages is in the left-hand column, but you can add or move boxes below that.
Adding Boxes
There are 5 different Box types you can choose from. Think critically about what you'd like the overall page layout to be and what type of box is most conducive to the information you are trying to convey.
- Standard Box: this box will likely be your most-used box. Click the Add / Reorder button to add various types of content and reorder content within the box.
- Gallery Box: create a box of rotating images.
- Tabbed Box: use a tabbed box to include multiple tabs of content in a single box.
- Profile Box: this box lets you add any user profile in your system to any page. Click the icon in the box's header to change the profile being displayed.
- Top/Bottom Box: only if you are using tabbed navigation template, you get a top and a bottom box. These boxes span all columns, no matter how many you have displayed on the page.
Read more
Refer to Springshare Help - Box Types and Adding Boxes for more information on how to add contents using different Box types.
Refer to Springshare Help - Best Practices for Building Guides: Boxes Types for best practices on when and how should you use different Box types.
Add/Reuse Boxes
| Steps to add a new box | Steps to reuse existing boxes by map or copy |
|---|---|
|
|
Reordering Boxes
You can rearrange boxes or move boxes between columns or page by drag and drop.
- Click on the PAGE link at the top of the page beneath your guide title.
- Choose Boxes from the Reorder/Move section of the dropdown.
- Drag and drop your boxes to their new locations. If you want to move a box to a different page within the guide, simply drag it over to that page in the left hand column.
- Click Save.
Adding Content/Assets
Assets are the actual content of your guides. Depending on the content type, some assets are included in the Assets library (Content>Assets) where it could be centrally managed.
| Content items in the Assets library | Content items that are not in the Assets library |
|---|---|
|
|
Read more
Refer to Springshare Help - Adding Assets for instructions and best practices on how to add different Assets to guides.
Adding Assets
- Click the Add / Reorder button within the box.
- Choose the asset type you want to add.
- Enter the necessary information for that asset (or reuse an existing asset).
- Click Save.
Note: Items added at the guide level will automatically appear in your Assets library. This does not apply to: rich text, polls, guide lists, or Google searches. Those items can be added to guides, but won't be listed in your Assets library.
Reusing Assets
Similar to Page and Box, you can reuse content items in LibGuides by "Map" or "Copy." To reuse an asset, you will:
- Click the Add / Reorder button and then choose your asset type.
- Choose the Reuse Existing ... tab. (Note: It's not possible to reuse the rich text, polls, guide lists, or Google searches).
- Search the asset by typing in its title in the search box. For example, type "Ask a Librarian" if you wish to reuse the chat widget.
- Copy: please leave the box unchecked to create a mapped item. Check the box will copy the asset rather than mapped to the original. The copied item will appear as a separate asset in the Assets library. Your copied asset won't be updated if any changes were made to the original.
- Click Save.
Reordering Assets
- Click the Add / Reorder button; then choose Reorder from the dropdown list.
- Drag and drop the box's content items to their new locations.
- Click Done Reordering.
Select the Rich Text/HTML asset type to add text, images, tables, and even code to your guide. If you’re adding links, databases, books from the catalog, widgets, or anything else that you can use one of the standard asset types for, you should use that asset type. Because Rich Text assets are not included in the central repository, they can only be reused by reusing the entire box.
To add a Rich Text/HTML asset, you will click the Add / Reorder button and then choose Rich Text/HTML. When the screen opens up a standard rich text editor will appear:

To make changes to an existing Rich Text/HTML asset, click the Edit button to access the rich text editor.
Tips on Adding Text
It is recommended that you type directly into the rich text editor; then use the functions in the text editor to add style and formatting. Creating the text elsewhere and attempting to copy / paste it into the text editor will bring in a lot of unnecessary HTML code and formatting.
- If you've already pasted your text into the text editor, highlight it and click on the Tx icon in the text editor. This will remove all the formatting from your text.
- If you haven't pasted yet, then use the Paste from Word option (clipboard with W icon) when paste content from Word. Or, use the Paste as Plain Text option (clipboard with T icon) when paste content from other places. This generally removes some, but not all, of your formatting.
Adding Images
When you are working with a Rich Text/HTML content item, you can add images:
- Save the image or screenshot to your desktop.
- Click on the add image icon , in the rich text editor.
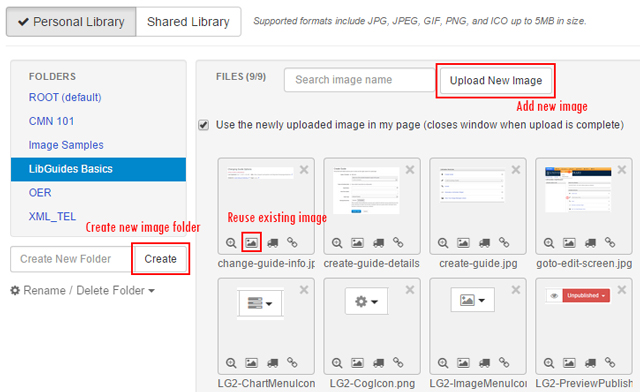
- In the pop-up window, click on Browse Server and locate the image in your Image Manager.
- If your image is not in the Image Manager yet, click the Upload New Image button and then browse for the image you saved. Also, consider using folders to organize your images. (Note: Images cannot be larger than 5MB.)
- If the image is already in the Image Manager, simply click on the icon to select your image and reuse it.
- Be sure to add an alt text to the image.
- Customize the height, width, border, padding, and alignment of the image.
- Click OK to add the image to your text.
Resizing Images
Sometimes your images are larger than 5MB and so they won't upload to the image manager library. To resize your images easily, go to webresizer.com, where you can upload and resize images quickly and easily so that they can be used on your LibGuides.
Adding Media
-
Choose Media/Widget from the Add / Reorder dropdown.
- Either create a new widget from scratch or click the Reuse Existing Widget tab to search for an existing asset.
- Add a Title and then paste in its Embed Code. (You can get it by looking for an "Embed" link on the interface you are using, whether that's YouTube, PiktoChart, etc.)
- Adjust the height and width, if needed; then click Save.
Creating Widgets
Widgets are chunks of code, like the embed codes that are used for youtube videos. However, it's possible to create new widgets to create lists of different content that can be found on LibGuides. It's also possible to make widgets that get placed outside of LibGuides. They also tend to automatically update themselves once made.
Before creating a new Widget, check existing widgets to see if you can reuse another widget.
You can make widgets for:
- Guides
- Blogs
- A-Z List
- Subjects
- Tags
- Search Box
- Users
- Content Box
Go to Tools> Widgets to get started.

Making a new Widgets
- Select which type of widget you want to create.
- Decide upon the Look & Feel, Search, Filter, and Display Order choices.
- When finished, copy the Embed code.
- Go to your guide and find the box where you want to add the widget. Click the Add / Reorder button, and choose Media/Widget.
- Paste your Embed code into the appropriate box, and create a relevant, descriptive title. This will help make the widget easier to reuse in the future.