Skip to Main Content

University Library, University of Illinois at Urbana-Champaign

Introduction to OCR and Searchable PDFs

Learn OCR best practices and how to begin an OCR project using ABBYY FineReader, Adobe Acrobat Pro, or Tesseract with this guide.

Handling Non-Standard Fonts

Training mode improves OCR recognition quality on documents with decorative or special fonts (e.g. mathematical symbols) by training the software to recognize particular characters. In training mode, a user pattern is created, which can be applied when performing OCR on an entire text. The "Read with training" option is disabled by default and will need to be enabled if needed.

Creating and Training a User Pattern

  1. Click the Options dialog box (Tools>Options) and then click the Read tab 
  2. Under Training, choose either Use built-in and user patterns or Use only User pattern (Note: Choosing Built-In and User patterns will use both the user patterns and the factory preset patterns for OCR)
  3. Select the Read with training option that appears
  4. Click the Pattern Editor...button
  5. In the Pattern Editor dialog box, click New...
  6. The Create Pattern dialog box will open. Type the name of the user pattern and click OK.
  7. Close the Pattern Editor and the Options dialog box by clicking the OK button in each.
  8. On the toolbar at the top of the Image window, click Read.
     Now if ABBYY FineReader encounters an unknown character, this character will be displayed in a Pattern Training dialog box like the one below.

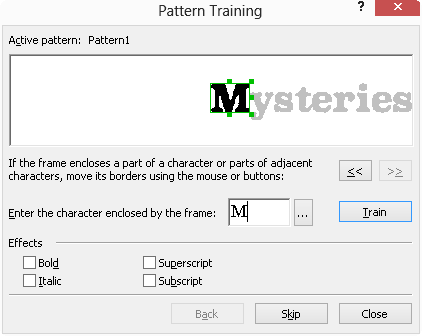
Note: It is not advised that you use the training mode in other cases, as the gains in recognition quality are minimum compared to the effort and time spent on training.

Also Note: You can only train ABBYY FineReader to read the characters included in the alphabet of the recognition language. 


Fixing Incorrectly Recognized Areas

ABBYY is a great tool, but sometimes it makes mistakes. Areas may be analyzed incorrectly and/or missed completely. When this happens, you may redesignate the incorrect and missing areas. You can use area editing tools available in the interface to:

  • Create a new area
  • Adjust boarders
  • Add or remove parts of areas
  • Delete areas

Creating a new area

First, click a tool in the Image window on the left-hand side of the editing frame:

This symbol will draw a recognition area

This symbol will draw a text area

This symbol will draw a picture area

This symbol will draw an area with a background photo and text overlay

This symbol will draw a table area


After indicating the kind of area you wish to create, hold down the left cursor button on your mouse and drag the cursor to select the appropriate area.

Once finished, you will need to re-read the page by clicking the "Read Page" button at the top of the editing window, or by right clicking and selecting "Read" from the menu that appears. Don't forget to save!

Editing Images

Editing images is an integral step in creating a quality final document. ABBYY allows for some simple edits to be done as you process your document.

  1. When you are on the page with the image you wish to edit, select the Page --> Edit Image to begin the editing process.
  2. ABBYY will open the page in an Image Editor window.
  3. Within the Image Editor, you are able to edit the image in several ways:
    • Deskew: Corrects image skewing
    • Photo Correction: Straightens text lines, removes motion blur, and reduces noise
    • Correct Trapezoid Distortion: Corrects perspective distortions
    • Rotate & Flip: Rotates the image to standard orientation (horizontally, left to right).
    • Split: Splits the image (e.g. facing pages) into separate units.
    • Crop: Used to crop the unneeded edges of an image
    • Invert: Enables standard inversion of document colors (dark text against light background)
    • Resolution: Changes image precision
    • Brightness and Contrast: Edits the brightness and contrast of the image
    • Levels: Edits shadows, light, and halftones
    • Eraser: Erases part of the image (could be used to redact information)
    • Remove Color Marks: Removes pen and other markings from the scan (only recommended for dark text on white backgrounds, not photos)
  4. Click the button of the tool(s) you need to perform the necessary adjustments. The left-hand side of the dialog box displays a preview of your alterations.